website design

Saturday, January 12, 2008

Run Google Talk Gadget in Firefox Sidebar

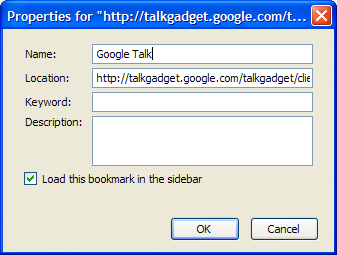
To add Google talk to your firefox sidebar, bookmark the following URL (right click and select bookmark this link) talkgadget.google.com/talkgadget/client
Now goto Bookmarks menu, navigate to the above bookmark, right click and choose Properties. Tick the checkbox that says Load this bookmark in the sidebar.

This method can also be used to run google talk in networks where google talk is blocked by the network administrator.

Click Here to Read More..

speed up your internet

add 20% to your bandwith by simple windows tweak. follow these simple steps and free 20% of your precious bandwidth. Actually this bandwidth is kept reserved with windows.....
1)start>run> type "
gpedit.msc"

2)expand "administrative templates" under computer configuration

3)expand "network" and click on Qos packet scheduler

4) on the right side,double click on "limit resrevable bandwidth"

5)check enabled radio button and set a lower value (like 10,use 0 for optimality)

6)finally click "ok" and restart your pc

Click Here to Read More..

Speed up your mozilla browser

Open up Mozilla Firefox and in the address bar type (without quotes), "about:config" and hit enter.

It should bring up a page of strings, Intergers, and Boolean settings.

Change these settings first - no matter what (common to all configurations):

Code:
network.http.pipelining, true
network.http.proxy.pipelining, true
network.http.pipelining.maxrequests, 8
content.notify.backoffcount, 5
plugin.expose_full_path, true
ui.submenuDelay, 0


Change these settings if you have a fast computer, fast connection:
Code:
content.interrupt.parsing, true
content.max.tokenizing.time, 2250000
content.notify.interval, 750000
content.notify.ontimer, true
content.switch.threshold, 750000
nglayout.initialpaint.delay, 0
network.http.max-connections, 48
network.http.max-connections-per-server, 16
network.http.max-persistent-connections-per-proxy, 16
network.http.max-persistent-connections-per-server, 8
browser.cache.memory.capacity, 65536


Change these settings if you have a fast computer, slower connection:
Code:
content.max.tokenizing.time, 2250000
content.notify.interval, 750000
content.notify.ontimer, true
content.switch.threshold, 750000
network.http.max-connections, 48
network.http.max-connections-per-server, 16
network.http.max-persistent-connections-per-proxy, 16
network.http.max-persistent-connections-per-server, 8
nglayout.initialpaint.delay, 0
browser.cache.memory.capacity, 65536


Change these settings if you have a fast computer, slow internet connection:
Code:
browser.xul.error_pages.enabled, true
content.interrupt.parsing, true
content.max.tokenizing.time, 3000000
content.maxtextrun, 8191
content.notify.interval, 750000
content.notify.ontimer, true
content.switch.threshold, 750000
network.http.max-connections, 32
network.http.max-connections-per-server, 8
network.http.max-persistent-connections-per-proxy, 8
network.http.max-persistent-connections-per-server, 4
nglayout.initialpaint.delay, 0
browser.cache.memory.capacity, 65536


Change these settings if you have a slow computer, fast internet connection:
Code:
content.max.tokenizing.time, 3000000
content.notify.backoffcount, 5
content.notify.interval, 1000000
content.notify.ontimer, true
content.switch.threshold, 1000000
content.maxtextrun, 4095
nglayout.initialpaint.delay, 1000
network.http.max-connections, 48
network.http.max-connections-per-server, 16
network.http.max-persistent-connections-per-proxy, 16
network.http.max-persistent-connections-per-server, 8
dom.disable_window_status_change, true


Change these settings if you have a slow computer, slow connection:
Code:
content.max.tokenizing.time, 2250000
content.notify.interval, 750000
content.notify.ontimer, true
content.switch.threshold, 750000
nglayout.initialpaint.delay, 750
network.http.max-connections, 32
network.http.max-connections-per-server, 8
network.http.max-persistent-connections-per-proxy, 4
dom.disable_window_status_change, true


apply these changes accordingly and see the result.

Click Here to Read More..

multiple login in yahoo!!

You can login with multiple id's on the same yahoo messenger without any download or patch .
Follow these simple steps
1. Go to Start ----> Run . Type regedit, then enter .
2. Navigate to HKEY_CURRENT_USER --------> Software --->yahoo ----->pager---->Test
3. On the right pane , right-click and choose new Dword value .
4. Rename it as Plural.
5. Double click and assign a decimal value of 1.
That's it done!!
Now close registry and restart yahoo messenger .For signing in with new id open another messenger .

Click Here to Read More..

Friday, January 11, 2008

remove page header from blogger
In page element section there is a page element named "page header". In the edit section there is not the option to remove this page element, still if you want to remove page header to give your blog a more professional and customized look then follow these simple steps.

go to Edit HTML. Find the section of code

< div id="'header-wrapper'">
< b:section class="'header'" id="'header'" maxwidgets="'1'" showaddelement="'no'">
< b:widget id="'Header1'" locked="'true'" title="'The" type="'Header'/">
</b:section>
</div>

and change "locked='true'" to "locked='false'".

 < div id="'header-wrapper'">
< b:section class="'header'" id="'header'" maxwidgets="'1'" showaddelement="'no'">
< b:widget id="'Header1'" locked="'false'" title="'The" type="'Header'/">
</b:section>
</div>
and save changes.
Now come back to the page element. click edit on the page header and you will find a button
"remove page element". click on the button to remove/disable page header.

Click Here to Read More..

Saturday, January 5, 2008

hide/remove blogger navbar

Blogger provides a navigation toolbar (called navbar) at the top of your blog page which spreads across the entire width of your browser.
Why to remove blogger navbar?

1. The color of navbar does not gel with my blog.
2. I want to customize my blog, give it a professional look.
3. The Search Blog Form is not integrated with my Adsense for search account. I want visitors to use my custom Google site search form that is monitized by Google Adsense.
4. The next blog button on the navbar takes your visitor to any other randomly selected blog. That blog may contain some inappropriate or adult matter.

How to remove/ disable blogger navbar?
Follow these simple steps to remove the navbar.
Log in to blogger

- On your Dashboard, select Layout. This will take you to the Template tab. Click Edit HTML. Under the Edit Template section you will see you blog's HTML.

- paste the CSS definition (in green color)in the top of the template code:

Blogger Template Style
Name: Minima Lefty Stretch
Designer: Douglas Bowman / Darren Delaye
URL: www.stopdesign.com
Date: 14 Jul 2006
----------------------------------------------- */
#navbar-iframe {
display: none !important;
}

/* Variable definitions
====================

type="color" default="#fff" value="#ffffff">

Remove the code to show it again.

Click Here to Read More..
Friday, December 28, 2007

Generic local host error for win 32 , fix the problem:

This error has been haunting most of Windows PCs from a long time and is really one dreadful bug. In one of my previous posts I have discussed a solution. That solution will cure the error but there is a problem that it would close the connection with network systems. So here are some solutions for those who work on a network.


First solution:

  1. Hop to ‘Run’ and open ‘Regedit’
  2. Navigate to:
    HKEY_LOCAL_MACHINE -> SYSTEM -> CurrentControlSet -> Services -> Browser -> Parameters
  3. Find the Key
    Name: IsDomainMaster
    and set
    Data: False
  4. Restart Your PC

Second solution:

  1. Go to ‘Run’ and open ‘cmd’
  2. Type ‘netsh’ then press enter
  3. Then type ‘winsock’ and press enter and then type reset
  4. Restart Your PC
Third solution:
Download LspFix and follow the directions.

Click Here to Read More..